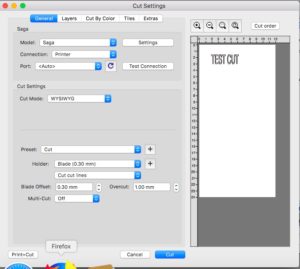
Usage Of Fonts As Vinyl Cutter Ready Vector Art

Although you can use virtually any artwork to vectorize with InkScape and cut with your vinyl cutter, the extended characters of font sets are perhaps some of the most readily available sources of good quality Vinyl Cutter Ready Vector Art (VCRVA). It is also very inexpensive to purchase fonts. You can get thousands of fonts for around $20.
Vinyl Cutter Ready Vector Art (VCRVA) is artwork that is made from closed loops and has weedable areas. If your artwork is not closed loop vector art then portions of it will not be able to be weeded. Font characters are looped vector art and are weedable.
Looking through the font list available in SignCut, Flexi and in InkScape you will see some of the characters available in the font set. Usually you will see A, B, C, D, etc. but you will not see the extended characters in the font set. A good way to see the extended characters in the font set is to use the Character Map tool in Windows.
Go to your Windows Start menu, Programs, Accessories (or Windows Accessories), System Tools and you will find the Character Map program. The program is charmap.exe so if you can’t find it, search your hard drive for “charmap”
Running this program you will see the fonts listed in the top. Pull down the arrow to change the fonts. Below this is the complete character set. Scroll down with the scroll bar on the right to see all the characters in the font. You will mostly be interested in the True Type fonts which are fonts identified with the TT in front of them.
As you scroll through the font sets you will see a variety of pictures like houses, planes, telephones, etc. You will also see arrows which are very commonly used in signs.
To lift the character from the character map, double click the character and it will appear in the characters to copy list down at the bottom. (You can also press the select button). Then click the copy button next to the Characters to copy: box. The character will now be on your clip board. Next, go to SignCut, Flexi, InkScape or other program and open up a text window using the create text tool. Select Edit and Paste (alternatively you can press CNTL+V as the keyboard shortcut for paste). The character should now be in your artwork or cutting software as text.
Posted in Vinyl Cutting Tutorials Tips And Tricks | Tagged , , | Leave a comment

Transfer Tape Selection For Vinyl Cutter Decals And Cut Vinyl Application

There are many types of transfer tape to choose from. When choosing transfer tape, keep in mind the following points:

  1. Tact – Your transfer tape should have a tact that will easily remove the vinyl from the release liner and then easily remove away from the applied vinyl
  2. Transparency – When you are applying your vinyl to your target surface it is highly advantageous to use a transfer tape that allows you to see through to your decal so you can see what you are doing.
  3. Cost – Although transfer tape is very important for aiding in the proper application of your graphics to the target surface, the transfer tape itself will be discarded and in and of itself it is not the end product.
  4. Ability to absorb release agents – Some transfer tape has the ability to absorb a release agent thereby having the ability to be removed with decals still wet. Other transfer tape that is hydrophobic will not allow release agents to penetrate to the adhesion layer and hence, will need to dry before it can be removed if the decal is applied wet.

ProCut Transfer Tape was chosen with a moderate tact and a paper backing so that it can be wet applied and can be removed with a release agent such as the ClearStar Splash fluid. These properties allow this transfer tape to be used with a wide variety of vinyls and allow it to be removed quickly during wet application by releasing the adhesive with the application fluid. Although it is not transparent, this transfer tape is semi-transparent / opaque which will allow you to partially see through during application. The transfer tape adhesion to the vinyl changes color somewhat when it is rolled with a squeegee which allows you to know if you have good adhesion to the tape and where you still need to apply pressure with your squeegee. The transfer tape is also inexpensive as it is a discardable consumable in the application process. During dry application, the transfer tape can be reused a few times. We use the vinyl release liner to store transfer tape for reuse.

If you are doing smaller, pre-cut decals where wet application will not be a consideration it may be better to choose a completely transparent application tape.

Posted in Vinyl Cutting Tutorials Tips And Tricks | Tagged , | Leave a comment

Vinyl Cutter Drag Knife Systems And Blade Offsets

Your vinyl cutter operates based on a drag knife system. This means that the actual cutting that your blade is doing happens behind the centerline of rotation of the blade shaft. Your blade holder restrains the blade with a magnet. As your vinyl cutter pulls the blade center along, the point of cut trails the center by a distance that is dependent on the blade angle but is approximately .008″ (for a Contour or Servo cutter). This means that when the vinyl cutter tries to make a sharp corner, it will need to  travel beyond the end of the corner by the blade offset distance and then rotate down to the next vector to continue pulling the blade. Flexi and SignCut do this regularly as a function of the blade offset that you enter into these programs. If you have 0 in for the blade offset, the corners will be rounded. If your blade offset is too high then your corners will have a lip. Getting the blade offset correct for the blade you are using is essential for good quality corners.

Blade penetration into the vinyl is based on force, not on depth and not by the blade holder cover. If your blade holder cover is too close to the vinyl it will scratch up the surface. There should be approximately the width of a credit card from the tip of your blade to the beginning of the blade holder cover. (see pictures)

Below you will find blade offsets as measured for ProCut Contour-Servo series blades as well as CR series blades.

ProCut Vinyl Cutter Blade Offsets For Contour And Servo Systems By Saga CNC

ProCut Vinyl Cutter Blade Offsets For Contour And Servo Systems By Saga CNC

ProCut Vinyl Cutter Blade Offsets For CR Series Blades

ProCut Vinyl Cutter Blade Offsets For CR Series Blades

Posted in Flexi, SignCut, Vinyl Cutting Tutorials Tips And Tricks | Tagged , , | Leave a comment

What You Need To Know – Important Points For A ProCut Contour Or Servo Vinyl Cutter

Following are some of the important points you should be aware of for your ProCut Contour or Servo vinyl cutter system manufactured by Saga CNC.

  1. Your vinyl cutter should be electrically connected to the stand. A green ground wire is included for this purpose. Make sure this wire is connected under the head of one of the stand fasteners. Connecting the stand to the cutter and then using conductive string on your vinyl is important for the dissipation of static charge, especially in dry environments less than 20% humidity.
  2. Your blade should be placed in the blade holder to protrude from the blade holder shield no more than the width of a credit card. Only the blade portion of the blade needs to be exposed. Do not expose the blade shank unless you are cutting very thick materials.
  3. The Teflon cutting strip is a white piece of Teflon running the length of your vinyl cutter under the tip of the blade. This strip must remain in good condition to allow for good cutting quality and even depth of cutting across the width of the vinyl cutter. If this strip gets damaged you can smooth it over with a spoon, tape over the top or flip it over and use the bottom side.
  4. The roller bar under the pinch rollers is non-continuous. The pinch rollers should be lined up with the white pinch roller marks on the front of the cutter so they are directly over the rollers and not between the rollers. The rollers are knurled and have micro-spikes on them to insure good traction with the release liner.
  5. The pinch rollers should be lowered onto the vinyl with the lever in the back right side of the cutter. Do not over-rotate the lever. Rotating the lever past the point of where the rollers lower onto the vinyl will cause the rollers to raise up again.
  6. The pinch rollers are all individually force adjustable by rotating the adjustment nuts. Without vinyl in place and with the rollers lowered onto the grit rollers on the bottom, the rubber wheels on the roller should not spin. If a wheel spins when it is in the down position then adjust the roller to lower the wheel. Conversely, you will not want to overtighten the rollers as doing so can cause an impression of the knurled roller to come through to the vinyl surface. Enough pressure is needed to insure the micro-spikes engage and penetrate the release liner but not so much pressure that the knurl pattern impresses into the vinyl.
  7. This vinyl cutter has optical limit switches on the left and right sides which will prevent you from cutting an image larger than the width of the machine. If your vinyl cutter tries to go beyond these optical limits then the carriage will be hard limited on either side and will nudge back into the cutting area. This will likely render your cut image non-usable so please be careful not to send images to your vinyl cutter that are larger than the cutting width.
  8. The vinyl cutter has a test button. This test button will create a triangle inside a square which is about 1 inch by 1 inch. Always test your vinyl with the test button. Weed the square. If the square weeds easily then remove the triangle. There should be a slight impression in the release liner from the blade. The release liner should not be cut through. The objective is to completely cut through the vinyl layer while just penetrating the release liner but not cutting through the release liner. Adjust your force settings until you achieve this result. Since the blade offset cannot be adjusted on the cutter directly, depending on the blade you are using the corners may or may not be sharp.
  9. If you experience a phenomena sometimes referred to as ‘knife sticking’ or ‘bunching’ this is due to too much force on your blade and perhaps too sharp of a blade angle. This is when your vinyl doesn’t slide under the blade and ‘bunches’ between your blade and the rollers. This usually occurs with more rigid substrates such as the release liner for heat transfer material. If the force is too high or the blade too sharp the blade will stick into the release liner and will not slide properly. If this occurs, reduce your cutting force. Decreasing the blade angle to a smaller (duller) angle will help resolve this as well.
  10. When the vinyl cutter displays Speed and Force settings in the LCD screen this indicates that the cutter is in online mode and ready to listen to your computer for commands. In online mode, you can change the force and speed using the speed and force buttons. By pressing the offline button, you can take the vinyl cutter offline. The speed and force buttons will now become the arrow keys which will manually move your carriage left and right and roll your vinyl front to back.
  11. When you take the vinyl cutter offline and move the carriage and put the vinyl cutter back on line by pressing the online button the carriage will automatically move back to the original home position. If you want to reset the home position to the new carriage position that you have moved the cutter to, press the Enter button. This will put the vinyl cutter back online and re-zero the carriage position.
  12. The Servo and Contour vinyl cutter systems have a laser alignment feature. This feature is semi-manual. Pressing the laser button will turn on and off the laser dot.
  13. For a PC connection, simply plug the unit into a USB port. In Flexi Starter, use the USB_Printer_# (where # is the port number, usually the highest number if you just connected your cutter). In SignCut, connect to USB00# where # is the USB port number.
  14. For alignment, it is important to roll out a substantial distance to make sure you are lined up within your margins over the length of the expected cut distance. If you expect to cut a 20 foot long image, roll out 20 feet of vinyl to make sure your vinyl will not move left to right more than about 1/4″-1/2″. If it moves more than this, adjust the angle of the vinyl on the vinyl cutter slightly and roll out the vinyl again.
Posted in Vinyl Cutting Tutorials Tips And Tricks | Tagged , , , | Leave a comment

Bigg Dawgg Graffix Racing Decal Cut On A ProCut Contour 4800 Using InkScape And Flexi Starter

As a continuation of the post “Font Cleanup Before Sending Artwork To A Vinyl Cutter“, Dan submitted the final result of his race car graphics for Bigg Dawgg Graffix. See picture below. This was produced with a Contour 4800 using InkScape for graphics generation and Flexi Starter 10 for sending the graphics to the cutter. This is an excellent example of the effect one can achieve with layering as it is very well executed with this example. Vinyl color selection is important to achieve the bright contrast that Dan has with this decal.

Example of Layered Vinyl Using a ProCut Contour 4800, Flexi Starter and InkScape

Example of Layered Vinyl Using a ProCut Contour 4800, Flexi Starter and InkScape

If you need assistance generating layered graphics as depicted above, please contact us at http://www.CutterPros.com

Posted in Flexi, InkScape, Vinyl Cutting Tutorials Tips And Tricks | Tagged , , , , | 1 Comment

Why Choose A Servo Vinyl Cutter Over A Stepper Motor Vinyl Cutter

When it comes to choosing between a stepper motor vinyl cutter and a servo motor vinyl cutter there are several points of consideration. Before jumping into these points, it is important to have an understanding of the difference in construction between a servo motor system and a stepper motor system. In a nutshell, a servo motor is a regular motor with an encoder disk on the back of the shaft that may be read by an optic. The motor has a brake as well. The motor spins, reads its position on the encoder disk and then stops the shaft upon command. A stepper motor is driven by magnets that are cut up into sections. When the magnets are pulsed, they rotate one notch. A typical stepper motor may have 200 notches per revolution. For very good, detailed explanations of the differences between these motors, please see Wikipedia:

http://en.wikipedia.org/wiki/Servo_motor

http://en.wikipedia.org/wiki/Stepper_motor

The following points should be considered when deciding to pursue a Servo Motor Vinyl Cutter:

  1. Servo Motor Vinyl Cutters are very quiet. When they run, you basically cannot hear the motors running. All you really hear is the solenoid actuating in the carriage and the vinyl running over the cutter. When I am on the phone with a client and performing test cuts I can never hear the vinyl cutter running in the background. Conversely, a stepper motor cutter is quite noisy. This noise comes from the way that the stepper motor actuates. The noise you hear is related to the pulse actuations of the magnets inside the motors. When I am on the phone with a client performing test cuts with a stepper motor cutter I always know when the cutter is running because I can always hear it in the background over the phone. Check back with this post later as we post recordings of the noise level between a ProCut Servo Vinyl Cutter by Saga and a ProCut Contour Vinyl Cutter by Saga (stepper motor driven). Because servo motors are so quiet, they are well suited to schools and office environments and for people that will do a lot of cutting.
  2. Servo Motors are very powerful and maintain accuracy under heavy loading due the the closed loop feedback. Because servo motors are better under heavy load than their stepper motor counterparts and compensate for slippage, they can more reliably pull through thicker materials such as .030″ thick magnetic material or Buttercut stencil material. If you are considering cutting through thicker materials then you will need a servo cutter.
  3. Servo Motors are much more accurate than stepper motors. Because servo motors utilize a closed loop feedback system with sensing on the shaft position servo motors will always hit their intended stopping point. This is not true with a stepper motor. If the system told the stepper motor to move 90 pulses clock wise but because there was significant drag on the system the motor slipped a few pulses and ended at 88 then the system would stop at 88 pulses thinking that it went all the way to 90. In addition, servo motor encoder disks generally have finer graduation than the stepper motor magnet teeth. Because of this difference, servo motors can cut longer cuts and are more accurate when closing the loop on a longer cut and in retracing the same vectors when needed.
  4. Servo Motors are faster. Although servo motors are faster, stepper motors can cut vinyl as fast as vinyl should be cut. Cutting speed in general is not really a point of differentiation between servo and stepper systems.
  5. Servo Motor Vinyl Cutter parts are much more expensive. Because the repair parts (especially the motors and the motherboard) are more expensive you will want to figure this into your decision making process. CutterPros helps alleviate some concern with a 3 year warranty on servo systems however, someday you may need to replace a motherboard or a motor.

If you have any questions regarding this post please contact us at http://www.CutterPros.com

Posted in Vinyl Cutting Tutorials Tips And Tricks | Tagged , , , , | Leave a comment

Sending InkScape Files To Flexi To Cut Artwork On A Vinyl Cutter

Although InkScape can produce many file types and Flexi can read in many file types, Flexi cannot read in InkScape native files directly. InkScape native files are SVG (Scalable Vector Graphic) files. The most consistently successful file type we have found and what we recommend you use is an EPS (Encapsulated Post Script) file.

In InkScape you will always want to save your original artwork as an SVG file but when you are ready to send your file to Flexi, save as an EPS as follows:

In InkScape, with your artwork open:

select – Save A Copy…

Under Save as type:

select – Encapsulated Post Script (*.eps)

Give your file a name and navigate to where you want the document saved

select – Save

The Encapsulated PostScript dialog box will open

Restrict to PS level – PostScript level 3

Convert texts to paths – check this box. This will convert your fonts to lines arcs and polylines or splines. This will make your artwork compatible with Flexi and will avoid font substitution issues and font incompatibilities.

EPS+LaTeX: Omit text in EPS, and create LaTeX file – DO NOT check this box. If you check this box your font text will not come over into Flexi successfully.

Rasterize filter effects – likely do not check this box. Define if you want to convert the marked objects into bitmap.

Resolution for rasterization (dpi) – 300 dpi is usually adequate

Export area is drawing – DO NOT check this box. This will clip your image if it is outside of the drawing area. In general you will want to export everything in the file.

Export area is page – DO NOT check this box. This will clip your image if it is outside of the page. In general you will want to export everything in the file.

If you have any questions regarding opening InkScape files in Flexi Starter please contact us at http://www.CutterPros.com

Posted in Flexi, InkScape | Tagged , , , | Leave a comment

Font Cleanup Before Sending Artwork To A Vinyl Cutter

Again referencing my sessions with Dan this weekend, when we made the numbers for his racecar we used a font that actually had some bumps in the sides of the letters. These indentations looked to us like they did not belong there. (The font was ReservoirGrunge by the way) We found this surprising as this was a commonly used font. We liked the way the font looked so we decided to fix the artwork. First we made the three offsets for the layered artwork. Next, we converted the font to strokes using the command, Path, Object To Path. There are many objects in InkScape like rectangles, Stars, Text, etc. that are not editable until you convert them to paths. Once we converted the text to paths we are able to use the node edit tool on the characters. The node edit tool is the tool just below the arrow on the top left sidebar menu. Clicking this tool and then double clicking on the numbers (or other artwork) you will see the nodes appear. Zooming in to where the deformities are in the artwork you will see the nodes that are out of place. If you select the node it will change color to a dark blue. If you hit the Delete key the node will be deleted and the line or curve will flatten out. Nodes serve as an inflection point in the curve so when they are deleted, the curve flattens out to the two next adjacent nodes. Alternatively, you can click and drag the node until it is in the location you prefer. If you zoom back out, you will be able to see the impact of your edits.

TIP – Zooming in and out is best done in InkScape by holding down the control key on your keyboard and rolling the mouse wheel. The zoom centers on where your mouse is pointed. To easily pan, zoom out, move your cursor to the place of interest and then zoom in.

Please contact us at CutterPros.com if you have any questions regarding node editing of your artwork. Cleaning up images is sometimes the most time consuming part of the vinyl cutting process.

Dan’s Racecar Numbers, Posted With Permission:

Race Car Number Artwork in Reservoir Grunge Font After Node Editing In InkScape


http://www.CutterPros.com


Posted in InkScape | Tagged , , , | Leave a comment

Artwork Quality Hidden Objects And A Vinyl Cutter

I had the pleasure of assisting Dan today and yesterday as he was doing offsets in InkScape to create vinyl overlaid numbers for his racecar. When we went to cut out the numbers we ran into an issue with the cutter stopping in the middle of the numbers. As you read prior posts you may agree that my first suspect was a static discharge interference with his communication. Upon the second try however, we found that the cutter stopped again in the same place. If this issue was related to static dissipation then we would expect random problems and random places of where the vinyl cutter may stop. We found however, a consistent location of where the cutter stopped during cutting. Looking at his original artwork file we found some lines in the file that were not visible in Flexi. These lines were the same color as the background and were essentially invisible. After recreating the artwork in a new file we were able to cut the numbers as intended. The numbers were large, about 23″ high. (Cutting large artwork with a stopping during cutting issue always makes me suspect static interference with the communication.)

If you suspect that you may have a graphics issue please try this:

  1. Open your file in InkScape.
  2. Use CNTL+A to select all the graphics in the file. You can also go to Edit, Select All.
  3. Next, go to Object, Fill and Stroke… which will bring up the fill and stroke editor.
  4. On the first tab (Fill), click the X in the top left corner. This will turn off the fill of all the artwork so you can see your lines. You may notice a lot of your artwork has ‘dissappeared’. It has not disappeared. Simply, the fill has been turned off and the vector lines were clear or transparent which results in no visible objects.
  5. On the second tab, (Stroke paint) select the solid color (the box just to the right of the X).
  6. This will turn all your lines to a solid color.
  7. Now take a look at your artwork. If a line appears where it isn’t supposed to you may have a phantom line in your artwork that should likely be removed.

If your artwork was grouped, it may need to be ungrouped and exploded before you can do the above steps. To do this, select all, then go to Object, Ungroup. Then go to Path, Break Apart. Doing this will explode your graphics allowing you to get to the individual components.

Once you have done the above, it is likely that you will not want to save this file as we have just exploded everything. This method simply allows you to see everything in your file so you know if you have phantom or hidden lines in your graphic that may not belong. Close the file without saving to reopen your original graphics.

If you have any questions regarding this procedure please contact us at http://www.CutterPros.com

Posted in Flexi, InkScape | Tagged , , , , | Leave a comment

Contour Cutting In Flexi Starter 10

Following are the steps for contour cutting graphics in Flexi Starter 10. This references
the CutterPros technical brief found here:

http://support.cutterpros.com/downloads/Contour-Cut-Tutorial-ProCut-Contour-Cutter-Flexi-Starter-10-08-05-12.pdf

  1. First, you must calibrate your cutter for the offsets that Flexi uses as the distance
    from your blade tip to the laser dot on the cutter carriage.
  2. To do this, create a 3″ x 3″ square.
  3. Create a contour profile (using Effects, Contour Cut…) around this 3” x 3” square and set the contour offset to 0 so that the contour and the square are the same 3”
    x 3” size. Press the green check mark when you are done.
  4. Create the contour cut registration marks. (Effects, Contour Cut Mark…) Press the green check mark when you are done.
  5. Cut the square first with a regular cut on some vinyl.
  6. Cut the contour next (contour cut icon next to the regular cut icon, this icon only
    turns on when a contour path and registration marks exist in your file) with
    offsets of 0 for the X and 0 for the Y. There is no need to remove the vinyl
    from the cutter. (In the Cut Contour screen, select the second tab (options),
    select Edit, Select Cut Fast and check the Offset X and Offset Y and set them
    to 0 and 0, these are the calibration coefficients)
  7. As accurately as possible, measure the distance between the two squares. A set of
    calipers works the best but a fine graduated ruler will work as well.
  8. The distance in X and Y are the calibration offset coefficients to use in Flexi
    Starter. These coefficients will be approximately -26.1 mm for the X Offset and
    19.26 mm for the Y Offset but will vary somewhat from cutter to cutter. Enter
    your measurements for these offsets. See slide 20 for additional details. The X
    Offset will always be a negative number and the Y Offset will always be a
    positive number.
  9. To verify your numbers, recut the contour on the original square with your new
    calibration coefficients, your contour cut should be very close if not right on
    top of the original square.
  10. VERY IMPORTANT – The Flexi contour cutting algorithms do not allow negative numbers. When you place your graphic vinyl into your cutter for contour cutting make sure that the origin is below and to the right of all registration marks. If a
    registration mark is to the right of the origin you will not be able to align
    to it because it would cause Flexi to go to a negative number which it will not
    allow during this process.
  11. VERY IMPORTANT – Using the mouse keys to click on the arrows on the screen during registration alignment is difficult and you need to have the mouse cursor well aligned to the black arrows. It is highly recommended that you use the keyboard arrow keys for registration alignment. If the cutter and the computer are far apart consider using a remote keyboard. The Contour and Servo cutters will start by moving very, very slowly (almost unnoticeable) but will increase in speed if you hold down the arrows for a few seconds. This makes it easier to do very small adjustments in position.
  12. VERY IMPORTANT – Some customers using the Contour or Servo series connect to a USB port. This will sometimes allow the cutter to work normally for regular cutting jobs but this will not work for contour cutting and registration with Flexi. You must have your cutter connected properly through USB_Printer_# where the # is the port number of your cutter. If you have any question regarding the connection settings of the Contour or Servo system please contact CutterPros technical support.
  13. Now, create or import your graphic file into Flexi Starter
  14. If your artwork is in vector format, Flexi will give you an offset profile from
    your vector art. If your artwork is a JPEG or other bitmap file, you will get a
    rectangle or oval as your contour offset. If you need an offset profile then please vectorize your artwork with InkScape first.
  15. Create your contour profile offset.
  16. Create your 4 registration marks. This option does not show up until after you have created your contour offset.
  17. Print this on your vinyl printer either directly from Flexi Starter or export this to
    your printing software (RIP Software) and print it. Do not print the contour loop, just the artwork and your registration marks.
  18. Place the printed vinyl into the cutter being mindful of point 10 above so that the origin is to the bottom right of all four registration marks.
  19. Run the contour cut with the contour cut button (not the regular cut button). Flexi will only send the contour path to the cutter for the
    contour cut.
  20. Register your vinyl to your cutter using the four registration marks.
  21. Run the contour cut.

If you have any questions or are in need of training or assistance contact us at http://www.CutterPros.com

Posted in Flexi, Vinyl Cutting Tutorials Tips And Tricks | Tagged , , , | Leave a comment